This post is automatically translated with LLM. The translation content has NOT been reviewed and may contain errors.
Latest news from the CloudFlare blog
(http://blog.cloudflare.com/google-now-factoring-https-support-into-ranking-cloudflare-on-track-to-make-it-free-and-easy) indicates that Google may factor in SSL support as a positive ranking signal. Therefore, I've enabled SSL for my blog.
Applying for a Certificate
SSL requires a certificate on the server side. It's best not to generate this certificate yourself, as most browsers will flag it as untrusted.
StartSSL is currently the only trusted certificate authority that issues free SSL certificates recognized by most browsers. You can follow the steps in this article:
http://www.freehao123.com/startssl-ssl/.
In practice, since StartSSL connections can be slow, following the wizard might cause the process to hang. If it hangs, you'll have to start over. Instead, we can generate the certificate request ourselves and submit it.
-
On your Linux server (this example uses Debian 7), run the following command to generate a private key:
openssl genrsa -out privkey.pem 4096 -
Generate the certificate signing request (CSR file) with the command below. The information can be filled arbitrarily—StartSSL doesn't verify it, only your private key matters:
openssl req -new -key privkey.pem -out cert.csr cat cert.csr -
Copy the output from the previous step.
-
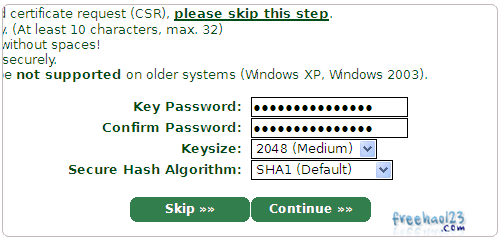
Follow the article linked above until this step, select "Skip," then paste your certificate request and proceed.
-
Installing the Certificate
After completing the steps above, you should have (at least) two files: your private key and the certificate file.
If you manually generated the CSR file, privkey.pem is your private key. If you used the web wizard, the private key was provided during the process.
-
Save your certificate as
ssl.crt. Subsequent steps will use this filename. If you used the web wizard, save your private key asssl.key. -
If you used the web wizard, decrypt your private key using the following command (the password is the one you set during the wizard). Without decryption, nginx will prompt for the password on every startup:
openssl rsa -in ssl.key -out privkey.pem -
Firefox has particular requirements for certificate verification—it expects the certificate file to include the issuer's certificate chain. Perform these steps:
wget http://www.startssl.com/certs/ca.pem wget http://www.startssl.com/certs/sub.class1.server.ca.pem cat ssl.crt sub.class1.server.ca.pem ca.pem > ssl-unified.crt -
You now have an
ssl-unified.crtfile. Move it andprivkey.pemto your preferred location. -
(Warning: Do not place them in web-accessible locations like
/var/www—that would be reckless! This example uses/root.) -
Edit your nginx configuration file:
cd /etc/nginx/sites-enabled```</li><li>```bashnano default # Replace if your config filename differs. -
In your site configuration section under
listen 80, add:listen 443 ssl; ssl_certificate /root/ssl-unified.crt; ssl_certificate_key /root/privkey.pem; -
Restart nginx to complete installation:
service nginx restart
Installing and Enabling SPDY
SPDY is a network protocol spearheaded by Google. It allows multiplexing multiple data streams within a single SSL connection.
Without SPDY, browsers open multiple SSL connections simultaneously to load resources. Often, mid-page load, the browser discovers additional needed resources and must open new connections, causing delays. SPDY eliminates this overhead by enabling concurrent downloads within one SSL connection.
-
Update your nginx version. The default nginx in Debian repositories lacks SPDY support. Replace it with
nginx-full:apt-get install nginx-full -
Edit your nginx configuration file. Change:
listen 443 ssl;to:
listen 443 ssl spdy;Done.
After enabling, if your website's images, CSS, JS, etc., are served from your server, this will significantly improve loading speeds under SSL.