This post is automatically translated with LLM. The translation content has NOT been reviewed and may contain errors.
Kimsufi is a budget brand under French company OVH, specializing in renting high-performance servers at extremely affordable prices. I personally rent the KS-4C model, featuring an i5-2400 processor, 16GB RAM, 2TB HDD, 100Mbps unmetered bandwidth, for just 13 euros/month. Its exceptional value makes it perfect for running virtual machines for experiments.
VMware ESXi (now also called vSphere Hypervisor) and Proxmox VE are two popular operating systems specifically designed for virtualization, both available for free. Crucially, Kimsufi's control panel offers one-click installations for both systems. However, during my usage, I found that Proxmox VE frequently suffered from unresponsive remote VM connections (VNC black screens) or keystroke loss (especially critical during password entry) under poor network conditions, so I switched to ESXi.
This led to another issue: ESXi isn't a full-fledged Linux/FreeBSD system and lacks comprehensive NAT functionality, meaning it can't run multiple VMs behind one IP address with port forwarding. However, since Kimsufi provides both IPv4 and IPv6 addresses, we can assign the IPv4 to a VM while configuring ESXi to use IPv6, then set up that VM to handle NAT.
This is precisely what we'll accomplish in this article.
Why I Wrote This Article
Because I encountered numerous issues during configuration:
- The command-line online upgrade method for ESXi 5.0 no longer works and throws errors;
- While ESXi 6's web interface is convenient for daily VM management (no client required), it contains bugs when configuring ESXi network settings.
Installing ESXi
The ESXi version provided by Kimsufi is extremely outdated (5.0), while the latest version at the time of writing was 6.7. Therefore, we must upgrade immediately after installation. However, due to VMware's policy changes, the following online upgrade method no longer works:
esxcli software profile update -p ESXi-6.5.0-20170702001-standard -d https://hostupdate.vmware.com/software/VUM/PRODUCTION/main/vmw-depot-index.xmlRunning this command on ESXi 5.0 results in XML format errors. Thus, we must use an offline installation package for local upgrading. But ESXi's wget doesn't support HTTPS, requiring an intermediate VPS for transfer.
Detailed steps:
- Connect via a proxy VPS (Shadowsocks) since VMware's download site verifies IP addresses.
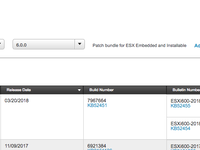
- Visit https://my.vmware.com/group/vmware/patch#search, select ESXi 6.0.0 (5.0 cannot upgrade directly to 6.5), click search to view patches:
- Scroll down to find any patch with a filename like
update-from-esxi6.0-6.0_update03:

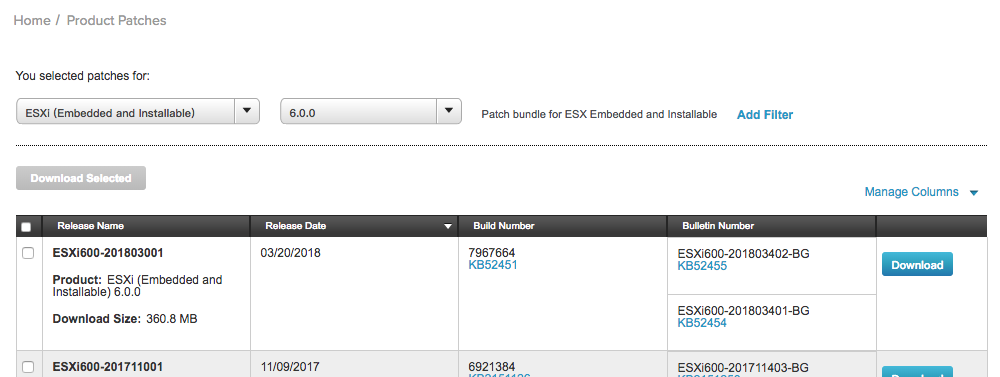
- Copy the download link, wget it on the VPS. After downloading, start an HTTP server on the VPS, then wget again from ESXi.
- Click the KBxxxxxx link in the third column (KB2148155 in the image above).
- Scroll down to the Image Profiles section on the new page:
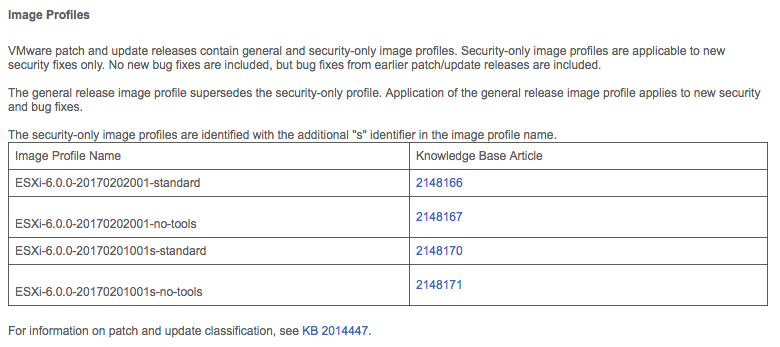
The name likeESXi-6.0.0-20170202001-standardis the target version name. - Run in ESXi's SSH:
esxcli software profile update -d [absolute_path_to_downloaded_zip] -p [version_name]Example:
esxcli software profile update -d /vmfs/volumes/datastore1/update-from-esxi6.0-6.0_update03.zip -p ESXi-6.0.0-20170202001-standardPress Enter to execute the upgrade, then reboot. 8. Return to Step 2, select version 6.5.0 (no 6.7 upgrade file available at writing time), repeat the process.
After completing these steps, we have ESXi version 6.5.
Configuring IPv6
Our goal is to assign IPv6 to ESXi and IPv4 to VMs. However, ESXi's web interface fails to save network settings properly, requiring CLI operations:
- Log into ESXi, enable IPv6 and reboot:
esxcli network ip set -e true- Enable IPv6 on the default NIC:
esxcli network ip interface ipv6 set -e true -r false -i vmk0- Assuming your server's IPv6 is
2001:41d0:1:234::1, your gateway is2001:41d0:1:2ff:ff:ff:ff:ff(refer to Kimsufi's IPv6 tutorials). Add two IPv6 addresses: your assigned IP and a random address in the same /64 subnet to allow gateway recognition:
esxcli network ip interface ipv6 address add -i vmk0 -I 2001:41d0:1:234::1
esxcli network ip interface ipv6 address add -i vmk0 -I 2001:41d0:1:2ff:12:34:56:78- Set default gateway:
esxcli network ip route ipv6 add -g 2001:41d0:1:2ff:ff:ff:ff:ff -n default- Ping from another IPv6-enabled VPS to confirm connectivity before proceeding.
- If your local network lacks IPv6, consider using Cloudflare to proxy the server's IPv6 address for easier management.
Installing Software Router
I use pfSense as the software router. First download the pfSense ISO to ESXi (HTTP supported, no proxy needed):
cd /vmfs/volumes/datastore1
wget http://frafiles.pfsense.org/mirror/downloads/pfSense-CE-2.4.3-RELEASE-amd64.iso.gz
gunzip pfSense-CE-2.4.3-RELEASE-amd64.iso.gz
In the web panel:
- Go to Networking > Virtual Switches, create a new vSwitch.
- Under Port Groups, create a port group connected to this switch (this will be the internal network for VMs):
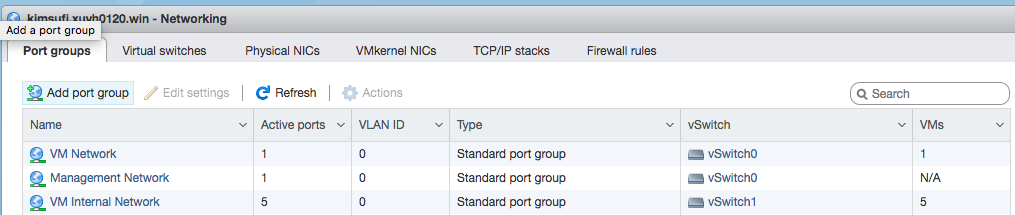
To allow ESXi to join the internal network: - Create another port group connected to the same switch:
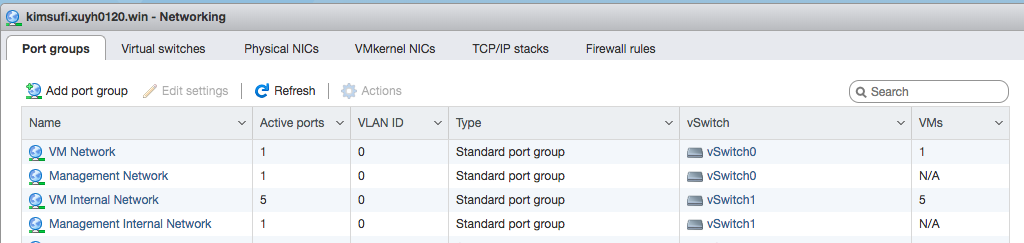
- Under VMkernel NICs, create a virtual NIC connected to this port group with "Management" service:
Copy the physical NIC's MAC address from the Physical NICs page. Since the datacenter binds IPs to MACs, we'll configure the VM to spoof the server's MAC address.
Create the VM normally. Note:
- Set the first NIC's MAC to match the physical NIC, connecting it to "VM Network" (external network).
- If connected via IPv4, ESXi management will disconnect briefly when the router boots (normal during IP conflict).
- The router can now ping externally but TCP connections will reset. Next, disable ESXi's IPv4 to resolve the conflict.
Disabling IPv4
⚠️ High-risk operation! If IPv6 isn't working and IPv4 is disabled, the server becomes inaccessible (requires reinstall)! Double-check IPv6 functionality first!
From an IPv6-enabled VPS, SSH into the server and run:
esxcli network ip interface ipv4 set -i vmk0 -t noneThe software router should now have normal internet access.
To connect ESXi to the internal network:
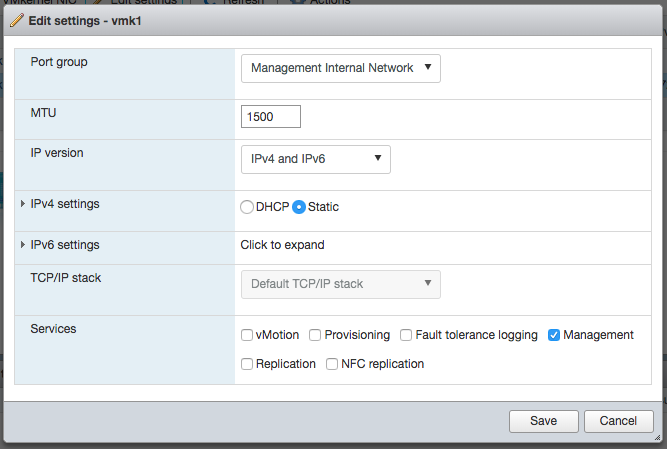
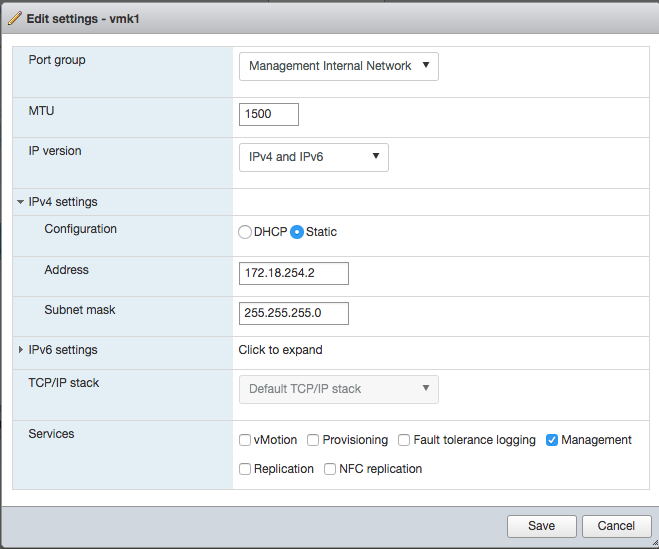
- In the web panel (VMkernel NICs), modify the manually created vNIC's IP to match the internal network:
- Run in ESXi SSH:
esxcli network ip route ipv4 add -g [internal_gateway_ip] -n defaultExample:
esxcli network ip route ipv4 add -g 172.18.254.1 -n defaultESXi can now access IPv4 sites through the software router.