This post is automatically translated with LLM. The translation content has NOT been reviewed and may contain errors.
Preface
Most ISPs in China do not provide IPv6 addresses to users, except for the Education Network. However, the IPv6 service on the Education Network is highly unstable (possibly specific to my institution), and once you leave campus, IPv6 becomes unavailable, which is quite frustrating.
One alternative is using HE.NET's tunnel service. After SixXS shut down, they are currently the largest remaining IPv6 tunnel provider, and their service is completely free. However, their service isn't suitable for home network environments in China, as home networks typically have dynamic IPs, and some ISPs have started using large-scale NAT to save costs, preventing users from obtaining independent IPs and causing conflicts within the same internal network.
The good news is that I have multiple VPS instances, all provided with IPv6 by either the VPS provider or HE.NET's tunnel service. This means I can use a VPN solution. But OpenVPN has long been unusable for cross-border connections, and other VPN solutions all have various issues.
ZeroTier One VPN, which I previously used for Docker networking, can effectively solve this problem. It features a central management panel with simple configuration, currently works without issues for cross-border usage, and even provides detailed official tutorials.
Preparation
For ZeroTier One registration, installation, and network joining, please refer to this article. This article assumes your VPS already has an IPv6 address block, and both the VPS and your IPv6-needing devices have joined the same network and can communicate.
If you previously enabled the entire address block as described in this article, you must disable it first. You likely added a command like this in /etc/rc.local or similar locations:
ip -6 route add local 2333:3333:3333:3333:3333::/80 dev loDelete this line and reboot the VPS.
Setting Up Forwarding
This article assumes the IPv6 address pool is 2333:3333:3333:3333:3333::/80, and the ZeroTier One virtual network interface is zt0. Please adjust accordingly.
Log in to your VPS and add the following directives to /etc/sysctl.conf:
net.ipv6.conf.default.forwarding=1
net.ipv6.conf.all.forwarding=1
net.ipv6.conf.all.proxy_ndp=1
net.ipv6.conf.all.accept_ra=2
After saving, run sysctl -p to apply the changes.
If you have an iptables firewall configured, add these two lines to your configuration and apply them:
ip6tables -A FORWARD -i zt0 -s 2333:3333:3333:3333:3333::/80 -j ACCEPT
ip6tables -A FORWARD -i henet -d 2333:3333:3333:3333:3333::/80 -j ACCEPT
ZeroTier Management Panel Settings
Log in to the ZeroTier management interface, enter your created network, and locate IPv6 Auto Assign (typically in the bottom-right corner):
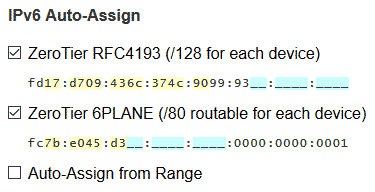
Check the "Auto Assign from Range" option.
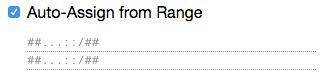
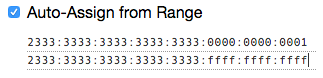
It will prompt you to enter the start and end addresses of your pool. For our example pool 2333:3333:3333:3333:3333::/80, configure as shown:
You'll notice ZeroTier One hasn't assigned IPv6 addresses from this pool to devices yet because routing isn't set. Find the "Managed Routes" option in the top-right corner. Enter the address pool 2333:3333:3333:3333:3333::/80 in the first box, leaving the second box empty, as shown.

Next, we need to instruct devices to use the ZeroTier virtual interface as the default for IPv6 connections. Add another route: enter ::0/0 in the first box, and your VPS's internal IPv6 address (the ZeroTier RFC4193-assigned address) in the second box, similar to this (remember to replace the address):

Save. The panel should now show your devices assigned public IPv6 addresses.
ZeroTier Client Settings
However, when you check your computer, you might not see the assigned public IPv6. This is due to ZeroTier's security policies. To prevent users from unknowingly routing all traffic through a ZeroTier network (i.e., using ZeroTier as a global VPN without awareness) and allowing network administrators unrestricted access, you must manually enable this feature on each device.
On Windows and Mac devices, you can enable this through the GUI. Open the Network Details interface:
Find your network and enable both "Allow Global" and "Allow Default" options for immediate effect.

On Linux devices, assuming your network ID is 2333333333333333, run these commands:
zerotier-cli set 2333333333333333 allowGlobal=true
zerotier-cli set 2333333333333333 allowDefault=true
This takes effect immediately. With this configuration, you've successfully built your own IPv6 tunnel that works reliably even with dynamic IPs.